 At Battleground Games in Abington the historical gamers have been taking a break from Axis & Allies and War at Sea. The store has at last begun stocking Flames of War.
This is a great WWII miniatures game put out by Battlefront Miniatures in New Zealand. I’ve had some stuff floating around my house for several years but have never spent any time on it. There is a solid group of gamers collecting armies and I took this as a sign to pull out my stuff.
Each week I try to spend a few hours working on my models and am hoping to chronicle my progress on the blog. I’ve already completed several weeks worth of work.
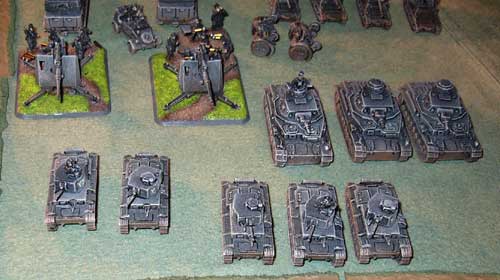
I am playing a Mid-War Panzerkompanie. The standard size force is 1,500pts and with that in mind I’m expanding what I already own with a few purchases. After much searching in my basement and closet I found a sizable tank force.
Closet Loot
- 1 Tiger 1E
- 5 Panzer III G
- 1 Panzergrenadier HQ blister
- 1 Panzergrenadier blister
- Sdfkz/70 trucks and other assorted trucks
All I still require are some BMW motorcycles and I should be all set. In addition to the above I purchased a Panzer IV H thinking it was a Panzer IV G but the H will serve as my company HQ.
I’ve assembled all of my tanks and even my trucks. The assembly has been quite easy because the models have no more than five pieces. The body is one piece and each tread is a separate piece. The turret for most of my tanks was glued on and only required my adhering the muzzle and machine gun to the turret and chassis respectively.
After assembling all of the tanks I began to paint them. For anyone who knows me the idea of my painting anything will elicit rounds of laughter. I am not a good painter. In fact I am quite horrendous. I also do not enjoy painting, perhaps because I suck, resulting me to often play with assembled models minus paint. The remarks about my bare plastic and metal models continue but I refuse to paint until I began work on my Panzerkompanie.
The paint scheme for my Panzerkompanie is quite simple. For accessibility reasons I am using Games Workshop paints. I prime the tanks Chaos Black using a spray primer or thinned from the paint pot. My base coat is Codex Grey, which I apply all over the model including the bottom. I’m careful to avoid the tank treads but any splattering is touched up with Chaos Black. Once the paint is dry I do touch ups of Codex Grey or if I’m feeling adventurous I add a second coat.
While one tank dries I begin work on the next model. I find that priming models in batches is a big help because I crave the assembly line technique. Having no more than two or three models in production at a time I’ve been able to complete one or two models in a three hour sitting. After the base coat is dry I apply a wash of Badab Black. I make sure to let it run into all the recesses. On some tanks I run a light coat of this over the entire exterior to give the tank a grimy look. After that is complete I mix a highlight for the tank. I put Codex Grey and Skull White together in roughly 80/20 proportions (Codex Grey:Skull White) for my first highlight. If the paint looks too light I add some more Codex Grey or even Chaos Black to the mix. Once I have the mix looking just right I drybrush the color all over the tank. On edges and corners it is a heavier drybrush than the rest.
By this point the tank is almost finished being painted. I have one more highlight to go and that is my light highlight. I create a 40/60 mix of Codex Grey:Skull White that I put on the edges. I try to imagine where light will hit the tank in my mind’s eye as it thunders across the battlefield. Usually I put these on the front. This is a light drybrush and has achieved a nice effect. Once dry I put some Gloss Varnish (aka ‘Ardcoat) to seal the piece. Despite this they still chip but that’s okay.
With the model fully painted it is time to base the armored beast. The tanks do not come with their own bases, but my trucks did, so I do a neat trick. I take some white glue also known as wood glue or pva glue. I use Elmer’s Glue but any brand is fine. I put a few drops on the bottom of the treads and where the guards are protecting the top of the treads. These are places that dirt and grass may get stuck. I dip the model in static grass, turn it upside down and tap it a few times to make the grass stand up. I use GW’s Scorched Grass and it has a nice look.

Using this method I’ve assembled and painted my Panzer IV H, Tiger 1E, and two Panzer III Gs. I’ve also used a similar method for my Sdkfz/70 trucks with two of the four completed. I found the method to be good for my Sdkfz/15 trucks (more like open cars) as well.
My models won’t win any awards but I’m proud of what I’ve accomplished. They look nice on the table and have elicited positive remarks from my fellow gamers. I’ve made a dent in the work but have much to do. Once all my tanks are finished I will complete my trucks. After that it will be time to assemble and paint my Panzergrenadiers who will actually be riding in the trucks. Then I will need to obtain, assemble, and paint my BMW motorcycles.


hi, whta colour did u use for the gry, i used german gry and it looks backish!! plz give me some tips
thank u