War at Sea: Task Force FAQ

Wizards has released an official FAQ for Task Force, which is the new War at Sea release.  The game became available for sale this past Friday and prompted lots of discussion regarding hopeful misprints.

Thankfully Wizards heard the dissent and answered the questions in their document.  We’ve turned their FAQ into a proper pdf file so you can download, print, and use it at your leisure.  This is a document that will be quite helpful to have at hand.  Not everyone checks online for updates and there’s a good chance that at least one member of your gaming group still believes the U-66 has speed 2.

While we could say go to War at Sea Task Force FAQ and read the pdf (you need the FREE Adobe Acrobat Reader) that wouldn’t be much of a blog article.  I know you, the reader, come here for more than my sparkling personality and superior gaming intellect.  Yes, I am jesting.  But seriously you enjoy, at least I pretend you do, my analysis and thoughts on the gaming issues at hand.

Some of the entries I knew about last week, say Thursday (after I opened several of my cases) or Friday but most people did not.  Richard Baker, lead game designer for War at Sea, announced a few of them on the official, read horrendous, Gleemax WoTC forum.  Most, however, of the entries are new.

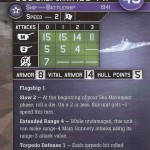
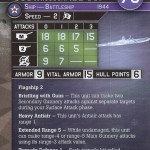
I strongly believe that several of the entries are unnecessary expenditures of time and energy on WotC’s end.  For example of course the Jean Bart, the bane of my existence, only has one turret.  If it was supposed to have more than one then everyone who pulled one, or in my case many, would have more turrets.  At bare minimum we’d be able to compare with other gamers and see that our Jean Bart was the only one with a single turret.

The question relating to the SM.79 is yet another space waster.  The Advanced Rules book specifically states that patrol bombers cannot base on a carrier.  More exactly it says that “carriers can only base Fighters, Dive Bombers, and Torpedo Bombers (p. 31 Advanced Rules book).

Luckily most of the questions are very good and the answers very helpful.  In particular the two dealing with smoke screens provide an answer to many questions.  I’ve been entrenched in a debate on the very issue all weekend long and at last the answer is at our fingertips.  Wizards has backpedaled and said that the rules for the Lay Smoke Screen SA from Set 1 is the way to handle it.

Other entries are helpful, and in my opinion should have been addressed before the release, but the star goes to solving the smoke screen confusion.

War at Sea Scenario: In Harm’s Way

On Saturday last we discussed the 1st official War at Sea Scenario by Wizards of the Coast.  Action Deferred: The Battle of Cape Teulada pitted the British versus the Italians in the Med Sea. Before that we shared the scenario Lions, Tigers, and Bears: The Battle at the North Cape. This time we have the 2nd official scenario to share with all you War at Sea fans. The scenario is titled In Harm’s Way: The Battle of Sunda Strait.

We found this, and the first, scenario in response to a comment made by Dane in the Lions, Tigers, and Bears article. For a long time we’ve said that reader participation makes this blog excel and Dane’s comment is yet another example. He prompted us to do the legwork resulting in our sharing two more great War at Sea scenarios.

Firstly, there are some required equipment that you will need to play this scenario. Take a gander at the list below to make sure you have everything.

  1. Maps. Use Battle Map 6 from page 6 of the Advanced Rules Book.
  2. Scenario Rules. Download them, read them (you need the free Adobe Acrobat Reader), and print them.
  3. Ships and Planes. Allies take 1 USS Baltimore, 1 HMAS Sydney, and 1 HMS Javelin (reinforcements). Axis take 3 Kinai Maru, 1 Jintsu, up to 5 Yukikaze, 2 Myoko (reinforcements), and 1 Yukikaze (reinforcements).
  4. Dice, tokens, and other standard accouterments.
The scenario depicts a Japanese invasion of Borneo and a combined American, Australian, and Dutch force trying to prevent the invasion. Whichever player has the highest VPs at the game’s end is the winner.  Points are scored differently for each side.  The Allies get 4VPs for each Kinau Maru crippled, 8VP for each one sunk.  They also get 2VPs for each crippled Japanese DD and 4 for each one sunk.  Lastly, they get 2VPs for each crippled Japanese cruiser (Jintsu and Myoko) and the full points cost for sinking cruisers.

The Axis get 1.5 times the point value of every sunk Allied ship.  They also get 12VPs for each Kinau Maru that is not crippled or sunk by the end of game.  The game ends when there are no longer vessels of one side remaining.

There are other special rules dealing with Unloading Transports (Kinai Marus cannot move), Battle Shock (severe movement restrictions for the IJN), Night Surprise (a remedy for Battle Shock) and of course reinforcements. Looking at the house rules we advise against using them because the official WAS Rules Clarifications and special abilities for models in Task Force adopt some of those house rules.

Be sure to check back for more War at Sea Scenarios.

War at Sea: Task Force Picture Card Gallery

This is the complete Task Force Picture Gallery. It shows all cards personally scanned in by me at 600dpi per card. Please note all our stat card scans (including these) are released under a Creative Commons Attribution-Noncommercial-Share alike 3.0 Unported license (as is everything on this blog). You must adhere to that license in order to use the scans.

I hope you enjoy the card gallery. Don’t forget to use the 2010 Starter Stat Cards, Flank Speed Stat Cards, Task Force Stat Cards, and Base Set Stat Cards.

You can enlarge any of the pictures simply by clicking on them. This will take you to a larger version where you can see all the text on the Special Abilities.

Before you click READ MORE please note that the gallery has 60 high resolution pictures. That will be resource heavy and if you use dial-up it will take a very long time to load. Dial-up users are better off going to Task Force Gallery Folders and peruse the folders by nation.

If you wish to download the complete gallery you can find the 20.3mb zipped file at Task Force Stat Card Gallery Zip (right click, save target as).

Read More»

War at Sea: Task Force Card Scans USS California & USS Missouri

This is the first part of our Task Force picture gallery series featuring card scans War at Sea and we’re starting with two great American ships.  We begin with the USS California and USS Missouri

The “Mighty Mo” as the Missouri was called had a brilliant career during WWII and beyond (including the Gulf War).  It holds several distinctions being the final battleship produced by the United States, serving as Admiral Bill Halsey’s flagship in the final months of the war, and being the location where Japan signed its official surrender.

You can click the stat cards to open a larger version.

The Mighty Mo was awarded 11 battle stars tying it with sister ship USS Iowa.  The Missouri had a crew of 2,700 officers and men who expertly staffed her.  Her armament made her a feared opponent and consisted of:

9 x 16 in (406 mm) 50 cal. Mark 7 guns

20 × 5 in (127 mm) 38 cal. Mark 12 guns

80 x 40 mm 56 cal. anti-aircraft guns

49 x 20 mm 70 cal. anti-aircraft guns

She is now a museum ship.

The USS California was a member of the Tennessee class of battleships being the final one commissioned in 1921.  It was refitted for World War II and played major roles in the Invasion of the Phillippines, most notably at the Battle of Leyte Gulf, and the action at Okinawa.  She served as the flagship of the Pacific Fleet until 1941.

During the attack at Pearl Harbor she suffered major damage and settled into the mud.  Over 150 of her crew were killed or wounded in the attack including Medal of Honor recipient Petty Officer 1st Class Robert R. Scott.  Scott later, in 1943, had a class of destroyers named for him.

The California was decommissioned in 1947 and ended her life sold for scrap in 1959.

All stat cards are high resolution scans made by me.  Please click the pictures for a larger version.

War at Sea Scenario: Action Deferred

Awhile back we discussed Lions, Tigers, and Bears.  No, we didn’t talk about the Wizard of Oz…really.  Lions, Tigers, and Bears: The Battle at the North Cape is a War at Sea Scenario depicting The Battle at the North Cape. This time we have another official scenario to share with all you War at Sea fans. The scenario is titled Action Deferred: The Battle of Cape Teulada and it is the first of, hopefully, many official War at Sea scenarios.

We found this, and the second, scenario in response to a comment made by Dane in the Lions, Tigers, and Bears article.   For a long time we’ve said that reader participation makes this blog excel and Dane’s comment is yet another example.  He prompted us to do the legwork resulting in our sharing two more great War at Sea scenarios. Firstly, there are some required equipment that you will need to play this scenario. Take a gander at the list below to make sure you have everything.

  1. Maps. Use the all-sea maps from the Starter Box
  2. Scenario Rules. Download them, read them (you need the free Adobe Acrobat Reader), and print them.
  3. Ships and Planes. Allies take 2 HMS Hood, 9 HMS Javelin (both as reinforcements), 1 HMS Exeter, 4 HMS Ajax, and 1 Swordfish Mk. II. Axis take 1 Vittorio Veneto, 1 USS Tennessee (replace with Guilio Cesare because that model is released in Task Force), 7 Luca Tarigo (all three are reinforcements), 4 Bolzano, and 7 more Luca Tarigo.
  4. Dice, tokens, and other standard accouterments.
The scenario depicts two convoys, one Axis and one Ally, crossing the Mediterranean Sea.  Players score 5 VPs per hit on each damaged or crippled ship.  They score VPs equal to the point value of sunk ships.  Lastly, they receive VPs for occupying enemy’s entry rows.  Each turn a British ship occupies a spot in Row A they earn 10 VPs or 20 if the occupying ship is the Hood.  Each turn an Italian ship occupies a spot in Row K they earn 10 VPs or 20 if the occupying ship is the Vittorio Veneto or Guilio Cesare.  Whichever player has the highest VPs at the game’s end is the winner.

There are other special rules dealing with Limited Opportunity (game ends in 1 turn if modified DR is 9 or more) and suggestions for house rules.  Looking at the house rules we advise against using them because the official WAS Rules Clarifications and special abilities for models in Task Force adopt some of those house rules.

The scenario officially calls for the Axis player to use a USS Tennessee to represent the Giulio Cesare.  But now that Task Force has been officially released the Axis player can use the actual Giulio Cesare model.  This is our recommended course of action but there are some important notes.  First the Cesare costs 9pts less than the Tennessee.  Secod the Cesare has weaker main guns (13 12 11 10) compared to the Tennessse (15 15 15 11).  Its secondary guns are more powerful, which is a plus (6 5 5) than the Tennessee (5 5 4).

It has two more major differences.  It has weaker armor and hull points (7 13 4) than the Tennessee (8 14 5).  But, unlike the Tennessee the Cesare is not slow.  The Tennessee suffers from Slow 2 as a special ability.  Avoiding that negative ability does prop the Cesare up a bit.  We do not see this severely unbalancing the scenario.  However, it does not seem to be a problem if players wish to give the Italians a handicap such as an extra Luca Tarigo (9pts) for Admiral Campioni’s Task Force.

Be sure to check back for the second War at Sea Scenario.  It is In Harm’s Way: The Battle of Sunda Strait featuring a combined Allied force of US, British, Dutch, and Australians versus the Imperial Japanese Navy.